Wednesday, November 30, 2011

Frosty!

I wanted to try a window card and incorporate my favorite
MS branch punch, so.....this is the result!
I have a male friend with a December birthday,
 and I think this will be a fit for that occasion.


The finished card measures approx. 5 x 6" and is embossed w/ the CB snowflake folder.
The circle cut-out is 4" and lined w/ individual branches.
The edges are rounded, accented w/ the same punch,
and then finished off w/ a button.
A lime green glitter ribbon made into a bow puts the finishing touches to the card front.


The inside is matted twice.
The snowman is made from a resized oval from PS.
The edges were inked w/ light blue,
and the face is a Peachy Keen stamp (I just love them!)
that has been colored w/ pencils.

The hat comes from WW and has been resized in DS to fit the snowman head.
It was cut in shadow and regular, was embossed w/ the CB swirls
and swiss dots folder, and was accented w/ 4 small green gems for holiday bling!
The stars are a left-over from another project and I think they are cut from WC.


I will add a "Happy Brrrrrthday" sentiment along the sides of circle cut-out
and a personal message on the back.
I like the finished project, but I think I will downsize the snowman a bit
on my next card and make the circle window on the front smaller.
TFL!


Monday, November 28, 2011

Peace

Here is another one of my favorite easel cards.
The finished card measures 5 1/2 x 6".
The front card base is matted 2x, embossed with the CB swirls folder,
 and the corners were embellished with a punch.


The deer is from the Christmas cart and is cut @ 4"
on both regular and shadow.
The font is from Winter Woodland and is cut @ 1 1/4 and 2 1/2"
in both regular and shadow.
The font paper is a bronze hologram metallic and adds elegance
to this holiday card.


The sentiments are computer generated, matted, and inked.
The corners were punched to match the card front.


A small "instruction guide" on how to assemble the card for display is added.
I am so pleased with this finished product....it is absolutely one of my favorites.
TFL!


Wednesday, November 23, 2011

Holiday Gift Bags

Instead of buying new gift bags this year,
I thought it would be cool to recycle ones that we had already received.
I used WW for the images on both of my projects.
They are simple but festive, and of course,
I will be "rebagging" this year!


Happy Holidays!
TFL!

Saturday, November 19, 2011

Butterfly Birthday Wishes

I have two dear friends with birthdays this month
and wanted to come up with a design
that is on the elegant side.

Since I love the butterfly on the Home Decor cart,
I wanted to make it the focal point of this card.

The card base is 5 1/2 x 6", and
I used double-sided paper from KCs ancestry.com paper stack.
I matted the front 2x, and added a strip of brown patterned paper
that was topped with a berry red strip that was punched with a swirl design.
A lace border was added to the bottom, and the corners were embellished with
the branches from a MS punch and finished off with gold sequins.
The butterfly was cut @ 3" and then cut again in "shadow" @ 3 and 3 1/4".
I embossed both shadows (swirls and swiss dots),
and popped this image 2x - once on the 1st shadow and again on the 2nd.

The oak leaf is from Disney Classics and was a leftover from an older project,
but I thought it fit in nicely with the November birthday theme.
The 2"  circle was cut 2x - once in black and once in white.
The image was stamped, inked in sage, and colored in soft pencil hues.


The inside was finished off with the same punched border as on the front of the card.
The sentiments were computer generated and matted with rounded corners.
I do like to add a personal touch by adding names, so if I
am making cards ahead, I usually wait to personalize the inside.
I used fall colors (red, orange, brown, black) for the overall theme.
A butterfly for the "birth" of a new year and the autumn overtones for this time of year.

I am quite pleased with the finished look and I do hope my
recipients will enjoy them as well.
TFL!

Monday, November 14, 2011

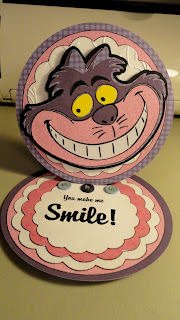
You make me smile!

What is better to cheer a person up, than a great big smile.

I found this image on the Disney Classics cart and it made me giggle.
As you all know, easel cards are my favorite;
so to add a different twist, I used a circle.
Simple, bright, fun, and can be used for multiple occasions or age groups.


Smile....and the whole word smiles with you!
TFL!

Friday, November 11, 2011

Mark the Spot

I just love this corner bookmark.
  I found the tutorial on Splitcoaststampers and just had to try it.


It is quite easy to make and the instructions are very clear....anyone can do it.
I used a double-sided paper from K&Cs Life's Journey for the base
 and the alternating patterns on the front.
I used a Fiskars punch on the edges and layered them for a soft, pretty look.
The embellishment and "Once Upon a Time" is from SB.
Add some pretty ribbon and the project is complete.
TFL!


Tuesday, November 8, 2011

Thanksgiving Feast Name Tags

Every year I make name tags for our Thanksgiving feast.
Not only is it is a tradition, but also a keepsake of our family gathering.


The base for this tag is a 4x8 piece of dark green cardstock,
scored and folded in half.
I then matted the computer generated name twice
with a fall patterned paper and a mint green.
I added a white ribbon to the top and popped all of the images.
The leaves are ACY, the oak leaf is Disney Classics,
 and the pumpkins are Pooh and Friends.
The pumpkins are embossed and inked,
 small green gems were added to the stems,
and the oak leaves were outlined with a black pen for definition.


The inside is finished off with the year (PS)
and the Happy Thanksgiving message.
This design would also be useful for a Thanksgiving Card where another
image or sentiment could be substituted for the name portion of the card front.
I actually substituted "Count your blessings" for the name and sent them out
as regular Thanksgiving cards.

I can't wait to set the table!
TFL!


Thursday, November 3, 2011

For the Birds

Here is a little card I put together for the FCC challenge this week.


The theme is "Anything to do with birds."
The background paper started as white card stock and was inked
with 4 different colors until the design you see was made.
 White glitter sparkles give a whimsical look to the butterfly and robin's eggs.
The frame is an SVG cut that was cut using my Cricut.
This card may be used for a birthday, get well, sympathy, thinking of you, or "just because."
  TFL!

Wednesday, November 2, 2011

Timeless and Elegant - A Masculine Card

I was so excited about this card.  I had seen a similar one on a message board quit a while ago and have had my own monocramatic vision in my mind for a long time.
This will go out to a dear friend of ours who will be having his special day in November.
It is always so hard for me to come up with a masculine card....
mine always seem to end up on the "girly side!"
However, this one is quite elegant and masculine at the same time.


This easel card is done in shades of brown with an emphasis on the bronze, sepia, and golden tones.
The primary background paper is from the DCWV "Tattered Time" paper stack.
The mats are layered in browns, and the cityscapes (PS) are cut in
 gold and bronze metallic papers @ 6 and 7"
with a shadow background.  They are also popped for added dimension.
A computer generated sentiment and MS branches that are punched from the same papers
 complete the front of this card. 


The inside is relatively simple -
Matted sentiment, buttons and twine added, edges inked and corners rounded -
VOILA!!  A finished project that is masculine and yet elegant.
I made a few of this card and will keep them handy for whenever I
need this type of card.  The sentiments will change with the occasion.
TFL!